
Nintendo Entertainment System Capacitor Replacement Guide
The Nintendo Entertainment System (NES) is an 8-bit home video game console developed and manufactured by Nintendo. Released as the Family Computer (Famicom) in Japan in 1983 and as the NES in North America and Europe from 1985, it became one of the most influential and best-selling consoles of its era.
| Specifications | |
|---|---|
| Manufacturer | |
| Type | |
| CPU | |
| Memory | |
| Storage | |
| Display | |
| Sound | |
| OS / Firmware | |
 | |
| Nintendo Entertainment System (front-loading model) | |
| Specifications | |
|---|---|
| Manufacturer | Nintendo |
| Type | Home video game console |
| Released | 1983 (JP, as Famicom), 1985 (NA/EU, as NES) |
| Discontinued | 1995 (worldwide) |
| Intro price | US$179.99 (NA launch, 1985) |
| CPU | Ricoh 2A03 (MOS 6502 core) @ 1.79 MHz (NTSC) / 1.66 MHz (PAL) |
| Memory | 2 KB RAM, 2 KB video RAM |
| Storage | ROM cartridge (up to 1 MB) |
| Display | 256×240 px (NTSC), 256×240 px (PAL); 48 colours, 25 on screen |
| Sound | 5 channels (2 pulse, 1 triangle, 1 noise, 1 DPCM) |
| Dimensions | 25.4 × 20.3 × 7.6 cm (front loader) |
| Weight | 1.4 kg (front loader) |
| OS / Firmware | None |
| Predecessor | Color TV-Game |
| Successor | Super Nintendo Entertainment System |
| Codename | AVS (prototype), Famicom (Japan) |
| Model no. | NES-001 (front loader), NES-101 (top loader) |
🧠 Architecture and Processor
The NES is powered by the Ricoh 2A03 CPU (a custom MOS 6502 derivative) running at 1.79 MHz (NTSC) or 1.66 MHz (PAL). The CPU integrates both the main processor and the audio processing unit (APU), providing five audio channels.
💾 Memory and Storage
The system features 2 KB of onboard RAM and 2 KB of video RAM. Game data and additional hardware are supplied via ROM cartridges, with later games including extra RAM, mappers, and co-processors.
🖥️ Display and Graphics
The NES outputs a resolution of 256×240 pixels (NTSC/PAL), supporting up to 25 simultaneous colours from a palette of 48. Graphics are handled by the Picture Processing Unit (PPU), which supports hardware sprites and scrolling.
🔊 Sound Capabilities
The integrated APU provides five sound channels: two pulse wave, one triangle wave, one noise, and one DPCM (sample playback) channel.
🎮 Input/Output and Expansion
The NES features two controller ports, an expansion port (underside, rarely used outside Japan), RF and composite AV outputs, and a 72-pin cartridge slot (60-pin in Famicom).
🧰 General Maintenance
Regular maintenance includes cleaning cartridge contacts, controller ports, and ensuring the power supply delivers stable voltage. The NES is known for its "blinking red light" issue, often caused by dirty or worn cartridge connectors.
🧾 PCB Schematics & Service Guide
Official service manuals and third-party schematics are available for both NES-001 and NES-101 models. These detail board layouts, test points, and component values.
📷 Motherboard Images
-
NES-001 motherboard (front)
-
NES-001 motherboard (back)
📚 Technical Documentation
📷 Gallery
-
 Nintendo Entertainment System (front loader)
 -
NES-101 (top loader)
-
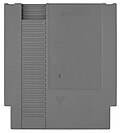 NES Game Pak (cartridge)


🧪 Related Pages
General Maintenance
- Clean cartridge slot with isopropyl alcohol and a soft brush.
- Inspect and clean controller ports.
- Check power supply output (9V AC, 850mA for NES-001).
- Replace 72-pin connector if games fail to load reliably.
PCB Schematics & Service Manual
Apple Service Manual
Not applicable to NES.
Logic Board & Analog Board Schematics
- See above NES-001 and NES-101 service manuals.
Capacitor Replacement Guide
Over time, electrolytic capacitors in the NES may degrade, leading to video, audio, or power issues. Replacing these capacitors can restore system stability and performance.
Tools and Materials Needed
- Soldering iron (fine tip)
- Solder sucker or desoldering braid
- Lead-free solder
- Replacement capacitors (see table below)
- Phillips screwdriver
- Isopropyl alcohol and cotton buds
Common NES Capacitors (NES-001)
| Reference | Value | Voltage | Type | Location |
|---|---|---|---|---|
| C6 | 220µF | 16V | Electrolytic | Power input (DC in) |
| C7 | 10µF | 16V | Electrolytic | Audio circuit |
| C10 | 1µF | 50V | Electrolytic | Video circuit |
| C11 | 100µF | 6.3V | Electrolytic | Power filtering |
| C13 | 47µF | 16V | Electrolytic | Power filtering |
Note: Capacitor values may vary by board revision. Always verify before ordering replacements.
Replacement Procedure
- Unplug the NES and remove all cables and cartridges.
- Open the case by removing the six Phillips screws on the underside.
- Remove the shielding and motherboard.
- Locate the capacitors to be replaced (see table above).
- Desolder the old capacitor, noting polarity (long leg = positive).
- Insert and solder the new capacitor, matching polarity.
- Trim excess leads and clean any flux residue.
- Reassemble the NES and test for proper operation.
Retrobrite
Yellowed NES plastic can be restored using hydrogen peroxide and UV light ("retrobrite" process). Always use gloves and eye protection.
Troubleshooting
- No power: Check power supply, C6 and C11 capacitors.
- No video/audio: Inspect C10 and C7.
- Blinking red light: Clean or replace 72-pin connector.
- Distorted sound: Replace C7.
Technical Details
System Architecture at a Glance
- CPU: Ricoh 2A03 (NTSC) / 2A07 (PAL)
- PPU: