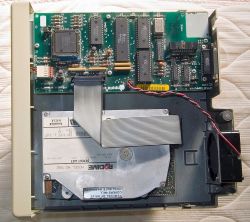
The Apple Hard Disk 20 (HD20) was Apple's first hard drive for the Macintosh. It does not use SCSI: it connects to the external floppy disk drive port and speaks Apple's Directly Connected Disk (DCD) protocol, which is why it works with a Macintosh 512K and why it cannot be moved onto a SCSI chain.
The mechanism inside is a Rodime RO552, a 3.5-inch drive. The photograph of the mechanism on this page was taken from a unit in this collection.
This page follows Apple's own Apple Hard Disk 20 Service Source for the disassembly order and its cautions. Where Apple published no figure - service intervals, storage humidity, lubrication schedules - this page says so rather than offering one.
The DCD interface uses the DB-19 disk port, but almost none of it the way a floppy drive does. Apple's specification assigns PH0 to PH2 to handshaking, PH3 to selecting between multiple DCD devices, IENBL2 as the enable, RD as read data and sense, and WR as write data.[1]
Two consequences for anyone working on one:
The HD20 is self-powered. The −12 V, +5 V and +12 V pins that the port offers a floppy drive are marked "N/C ... DCD to be self-powered".[1] The computer supplies no power to the drive, so a Macintosh that will not start with the HD20 connected has a signal problem or a cable problem, not a current problem.
The link runs at 489.58 kbit/s, a rate fixed by the Macintosh's 7.8333 MHz clock rather than a round number, for a net data rate of 428.38 kbit/s after the IWM's most-significant-bit overhead.[1]
Warning: unplug the HD20 before opening it. The plastic case becomes brittle with age.
Apple's order, from the Service Source, is cover, controller board, bottom shield, fan, power supply, hard drive - each step depends on the one before.[2]
Apple Hard Disk 20 with the lid removedCover. Turn the unit upside down and remove the single Torx screw from the case bottom. Use a jeweller's screwdriver to release the tabs that hold the cover. Apple's caution is explicit: "Do not use a screwdriver to separate the case." Separate it with a Macintosh pull-apart tool or a plastic case opener.[2]
Controller board. Remove the grounding screw. Disconnect four cables - power supply, hard disk, fan and interface. Remove the four mounting screws and lift the board out.[2]
Bottom shield. Remove the two retaining screws. The shield lifts out with the power supply, hard drive and fan still attached to it.[2]
Fan. Two mounting screws. On reassembly, the air flow arrow points to the rear of the case and the rotation arrow points down.[2]
Mild detergent or isopropyl alcohol on a cloth. Avoid solvents. See Retrobrite before committing a yellowed case to peroxide treatment - the results are not permanent.
Do not open the head-disk assembly. The photograph here shows one opened for documentation, not as a repair step. Opening a sealed HDA outside a clean environment contaminates the platters, and a contaminated platter takes the heads with it.
Do not oil the spindle bearing. Advice to put "two or three drops of light oil" into an HDA circulates widely and has no manufacturer basis. Oil that reaches a platter surface ends the drive; a spindle that has actually seized is a mechanical failure, and the realistic options are a donor drive or an emulator. If a drive will not spin up, check the supply and the drive electronics first - a seized spindle is much rarer than a failed supply.
Replacing the electrolytics in the power supply and on the drive's own logic board is reasonable preventive work on a unit of this age. See Capacitor Failure Symptoms for what failing ones look like and Hard Drive Maintenance and Repair for general drive-side work. This wiki has not found an Apple component listing for the HD20 supply, so no values are given here; read them off the parts fitted.
No power, no spin-up. Check the mains lead and the fuse, then the power supply outputs at the connector against the markings on the supply itself. The drive draws nothing from the Macintosh, so the computer is not the variable here.[1]
Spins but is not recognised. Check the interface cable and the controller board connections. The HD20 needs the Macintosh to have HD20 support - either in ROM or loaded from the startup disk - so a machine that has booted from a disk without it will not see the drive. This is a software condition, not a fault.
Spins down immediately. Either the supply is collapsing under load or the mechanism is drawing too much. Disconnect the drive and see whether the supply holds up on its own.
Noises. Repeated clicking is the heads failing to find servo information; grinding is mechanical and means stop immediately, because continuing costs you the platters.
Data errors. Apple's own HD-20 Tests utility exists and is archived; run it before concluding the mechanism is failing.
Inspect for cracked solder joints, particularly around the connectors that take mechanical strain, and for corrosion. Reflow suspect joints. Remember that the board and the drive are both destroyed by the wrong drive cable, so check the cable before powering up a board you have worked on.[2]
Clean it, and re-oil the sleeve bearing if it is that type. On refitting, get the orientation right: air flow arrow to the rear, rotation arrow down.[2]
Store the unit somewhere dry and stable, out of direct sunlight, and inspect before applying power after a long period: look for corrosion, rodent damage and anything that has grown in the case.
No manufacturer figures exist for HD20 storage conditions, and Apple published no maintenance schedule for it. Specific temperature and humidity bands, and advice to spin the drive up periodically "to redistribute the lubricant", are not Apple recommendations. Running a drive occasionally does let a fault announce itself while you are watching, which is worth something; it does not preserve anything.
Back up the contents the first time the drive comes back to life, before doing anything else with it. A drive of this age that reads today may not read next week.
↑ 1.01.11.21.3Rigid Disk Interface Specification / Software Protocol for Directly Connected Disks, version 1.2a, Apple Computer, Inc., May 1985 - hosted on this wiki as File:Apple Directly Connected Disks Specification 1985.pdf. The DB-19 pinout as used by a DCD device, with PH0-PH2 for handshake, PH3 for multiple devices, IENBL2 as enable, RD as read data and sense and WR as write data; the marking of pins 5 to 8 as "N/C - DCD to be self-powered"; serial transmission at 489.58 kbit/s (2.042 microsecond data cell) for a net 428.38 kbit/s, set by the Macintosh's 7.8333 MHz clock; the seven-data-bytes-to-eight-transmitted-bytes grouping required by the IWM's always-set MSB.
↑ 2.002.012.022.032.042.052.062.072.082.09Apple Hard Disk 20 Service Source (Take Apart and Exploded View), Apple Computer, Inc. - hosted on this wiki at Apple Hard Disk 20 Service Source, file File:Hard disk 20.pdf. Cover removal: one Torx screw in the case bottom, a jeweller's screwdriver to release the tabs, the caution "Do not use a screwdriver to separate the case" and the instruction to use the Macintosh pull-apart tool. Controller board: remove the grounding screw, disconnect the power supply, hard disk, fan and interface cables, remove four mounting screws. Bottom shield: two retaining screws, lifted out with the power supply, hard drive and fan still attached. Fan: two mounting screws, with the replacement note that the air flow arrow points to the rear of the case and the rotation arrow points down. Power supply: three mounting screws. Hard drive: disconnect the drive cable and remove four mounting screws, with the replacement note that "the hard drive cable is not a standard ribbon cable. An incorrect cable will cause serious damage to the hard drive and/or controller board."